Tuesday, February 28, 2012

Bal Masque 2012 at the Appalachian Brewing Company


Alright, finally back in business and working on a new post! It feels like I've been down and out for far too long. I had a small recess between getting well and then getting sick again though where I got to attend the Bal Masque! This event is hosted by the Harrisburg Art Association and they have a small site dedicated to it here: http://www.artassocofhbg.com/bal2012.htm. Since I haven't worked on much while being sick, I thought it might be a good idea to talk about this awesome event instead.

I had worked on a few masks in anticipation of this event, and it's that funny that when it came down to it, I went for simple and comfortable versus intricate. In the future, I'm going to have to make sure that I take into consideration how good a mask feels when you wear it as well as if it's going to stab other people in the eye when you walk by! All things I had not considered prior to this masquerade.

Our masks - grainy pic, but the only one I have!

My husband wore the Bird Splicer Mask and I wore a last minute bit I made to match my dress. I wanted to wear the Labyrinth mask, but I was worried about knocking the horns on someone or something and possibly breaking it. The place ended up being a lot more open than I had expected though and I could have pulled it off!

The other mistake I made was in the rush to get ready, I completely forgot about the camera and we ended up using my mother in laws iphone to take all of our pictures. Most of them came out quite horribly though because it was dark and some were kind of grainy as well. So I borrowed some pictures for the sake of this post not looking like an ashtray.

Two birds getting photo bombed!

Anyway! My husband and I were originally going to go as Splicers from Bioshock. He played the part well and I got the retro part down of my costume, but I wasn't able to have a finished mask in time for us both to be splicers after some technical difficulties with my Owl Mask. All was fine though and the event was a lot of fun!

Dancing!

They had good food, a bar, dancing, music, a silent auction, and even palm readings which I didn't see while I was there or I probably would have gotten one! A lot of the events we didn't know about until they actually happened, like the costume contest which was a blast. I met a lot of really great people there as well who had some amazing costumes and masks! It gave me so much new inspiration to work with!

A pair of stinkers! These guys were so cute.

If you're local I would definitely recommend giving this a try next year! I haven't been to anything like it and it was truly enjoyable. I'll have to make sure I get my costume and mask ready with ample time to spare for this coming year! I'll leave you with some more pictures of the event because there were so many good ones, I wasn't able to fit them all here.

Thanks for Reading and Happy Creating!

His mask was really amazing up close.
Awesome costume!


Pimp and "Friend" LOL
Loved these two costumes and accessories!

 Some Photos taken from: T. Tran and the AHH

If you enjoyed this post please share it with your friends! I also love a comment! You can get up to the minute updates by following me on Facebook by clicking here. I'm also on Youtube now; please subscribe by visiting my channel here.
 

Thursday, February 23, 2012

Being Sick is So Frustrating!

I am so sorry for missing a whole weeks worth of posts!

I will try to get back on track this Friday if not by this coming Tuesday. I felt better by Saturday and made it to my masquerade ball only to fall ill again. I have been sick since and it feels like I'm never going to get well again! Needless to say I haven't had much of a chance to work on anything to even blog about :( I will get back on track as soon as I'm better!

Wednesday, February 15, 2012

Labyrinth Inspired Goblin King Mask Part 2

This is part 2 of this post series - please check here to see part 1 if you haven't already read it.  


It's taken me forever to finish this mask partly because I've been working on several at the same time and also because I was very particular about the sculpting process. I also had to go through ordering a new Dremel after trying to find a replacement battery charger for a week or so! For better or worse. it's finished now! I don't have as many pictures as I'd like to have, but I can explain through the rest of the process.

I ended up covering the mask with modeling paste to smooth it out a bit more, and then painted a couple layers of white gesso on as well. Once all was dry I sanded it (with fine paper) and started painting in my actual colors. It was funny to use painting techniques I would usually use on a canvas, on a 3d surface!


I had already decided to make this mask more like that of worn copper. I wanted it to be very metallic as well. I mixed several colors for the facial part of the mask,and used a metallic gold/ brown color for the horns. Once these layers were set, I went in and added my shading which I used dark brown for on both accounts. In the below picture, you can see the difference in the horns, where the right horn has been shaded with dark brown while the other is still that bright gold color.


Once all of the coloring had been completed, I painted on a layer of matt varnish. And finally I found out why you have to wait 24 hours between layers or even before trying to do any work with it. Varnish takes forever to dry! And it's awfully sticky stuff! I was trying to do too many things at once because I was in a rush to get this blog post up after being sick, but I soon found that I couldn't rush it as this varnish even after 3 hours was still sticking to everything. So make sure you let your varnish dry! For future reference, I may just invest in some clear coats of acrylic paint so that I don't have to use varnish anymore for finishes.

Once the varnish finally did dry, I was able to attach some nose pads along with the felt lining and the elastic headband. You quite literally have to do this all at the same time and it can be a pain. When all is said and done, I really like the way this mask turned out. It has a personality of it's own which is what I like to go for with inspired masks. Not necessarily a direct copy, but a close brother of the Goblin King.


Thanks for Reading and Happy Creating!


If you found this post helpful please share it with your friends! I also love a comment! You can get up to the minute updates by following me on Facebook by clicking here. I'm also on Youtube now; please subscribe by visiting my channel here.
 

Friday, February 10, 2012

How to Make an Alginate Mold of Your Face

 This post is part of a series dealing with making armatures. To see the first part on making a plaster cloth mold click here.

I'm going to make one big disclaimer and warning here. Do not attempt this unless you think you are capable of being completely blind and unable to speak while breathing through a straw for at least 30 minutes!!! You will also need a friend to help you as it is not possible to do this alone.

I honestly didn't think this would be a big deal, but it takes an incredibly long time for your helper to get everything together and on your face. And during that time you are stuck to drool all over yourself while not being able to see or talk. It really sucks. It was a cool experience to have done once, maybe twice at the absolute most, but no more than that! Get your mold and cast your face and make any future molds off of that face and not your own!

Now that I've gotten that out of the way, let's move along!

Alginate / Stone Method

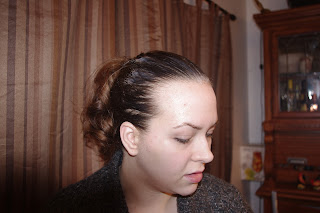
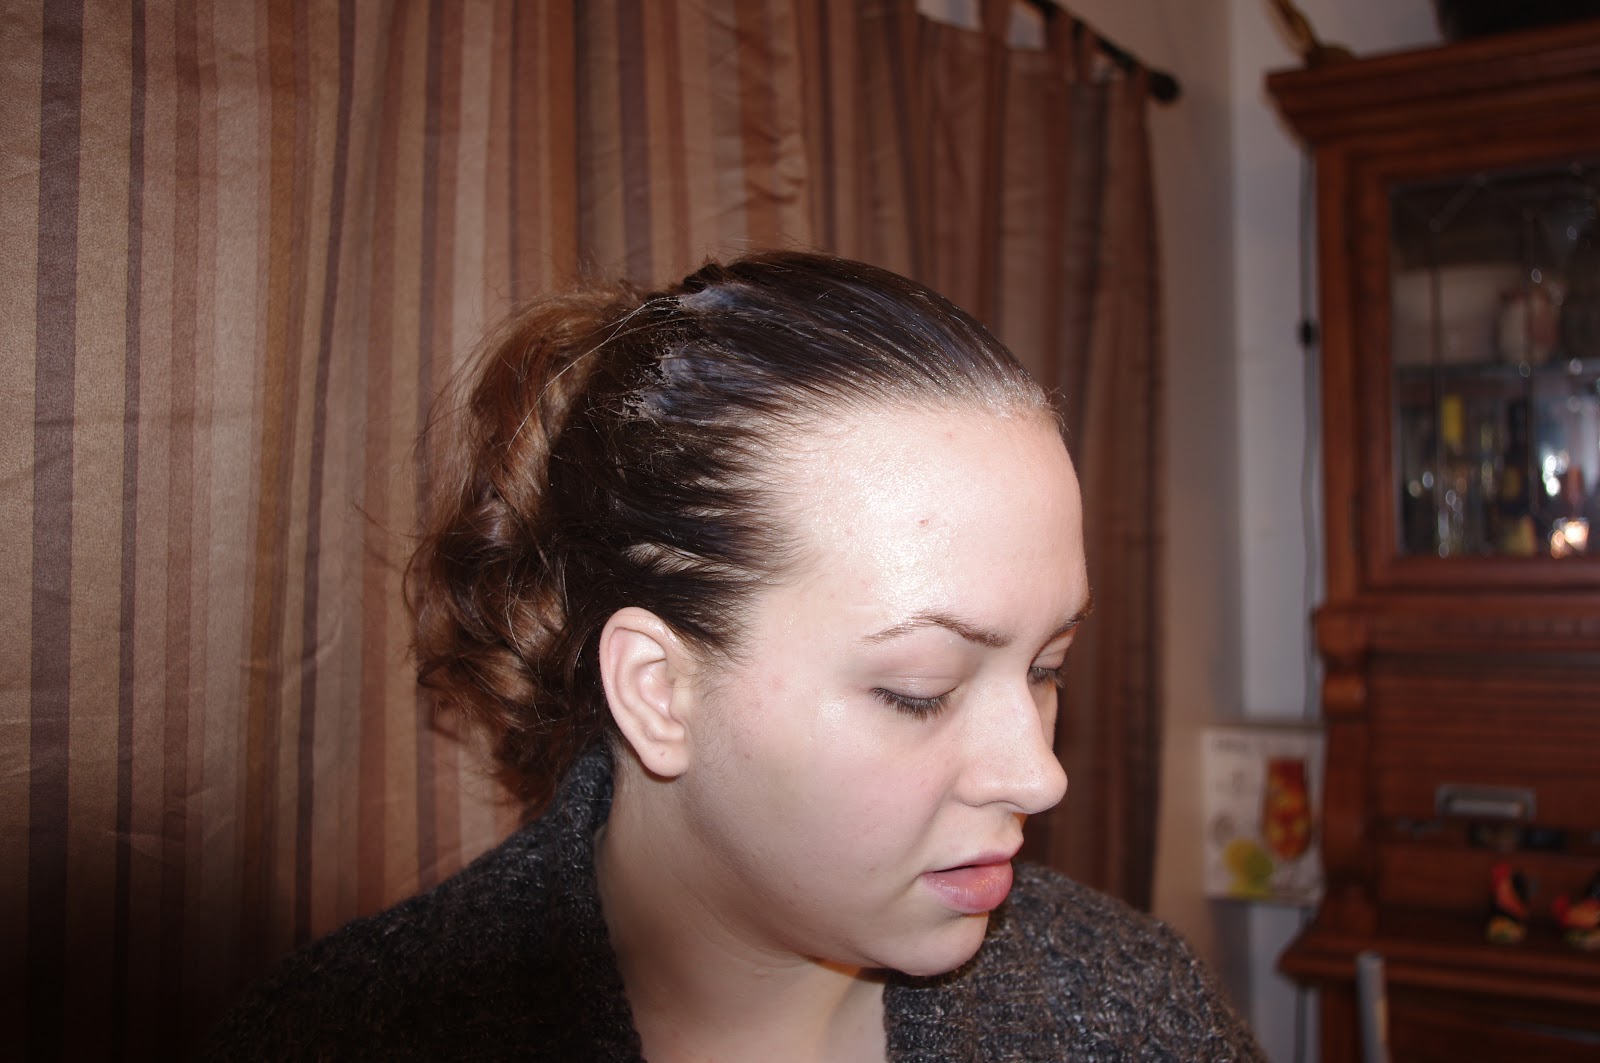
Step 1: Since you'll want this to lay flat when it's cast, you may have to go into your hair a bit. I used petroleum jelly and it worked ok for my eyebrows, but not my hair. I was able to get it out by pulling it out (with no pain) but there may be better ways to do it. One person suggested hair conditioner with cholesterol in it. Make sure to use something to protect your hair though. Anything is better than nothing!

Greasy Hair!

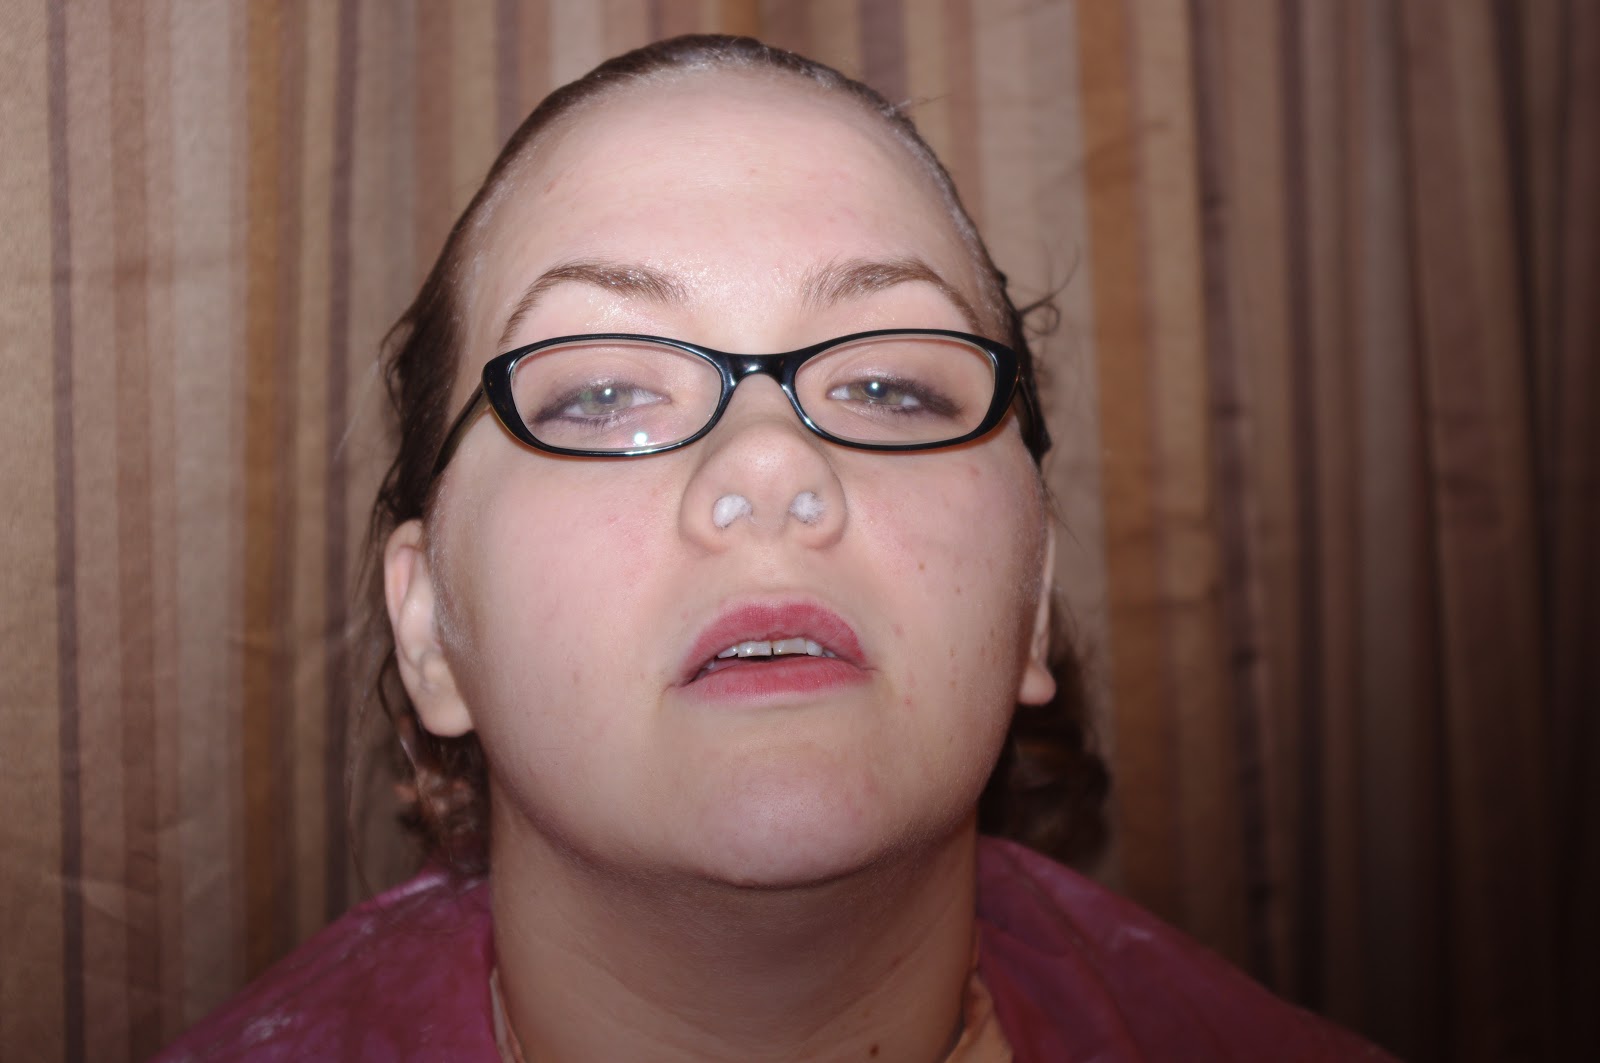
Step 2: Protect your nostrils by placing tiny amounts of cotton balls in them. Don't push them up; just let them kind of hang loose. Also get a straw and cut to a good size for you to be able to comfortable hold in your lips and breathe through. Bite down on it loosely so that you do not have this huge circle between your lips.

No, it's not a booger.

Step 3: Measure and mix your alginate. To elaborate, alginate is a product you can purchase online or from a dentist. I'm lucky and my godmother works for a dental lab and so she was able to order it directly for me.

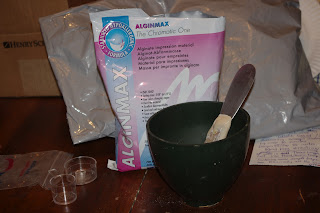
Aglinmax alginate, plaster mixing bowl, spatula, and measuring cups.

I'm not sure what the deal was with the alginate I used. It must have been fast setting because I could barely mix it and it was already drying. I'm hoping if I ever use the stuff again that I can get a different brand. My husband had to mix 2 batches separately to do my entire face.


Step 4: Spread the alginate all over the face! I have seen some use alginate that looks almost liquid, but my alginate was lumpy and so it was easily spread with a spatula. You can get one at home depot in the paint section.

Not the type of girl you bring home to meet the parents!

Get the entire face covered! Mine had a little spot left open by the nose mainly because it was freaking me out when my husband went by this spot. I thought alginate was going up my nose, but it was just the cotton that went up a bit too far. It's funny because the cotton is supposed to keep the alginate out and it did, but I didn't know >_<!


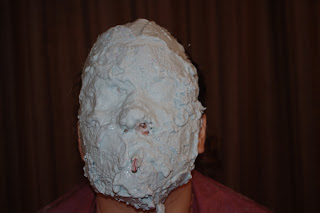
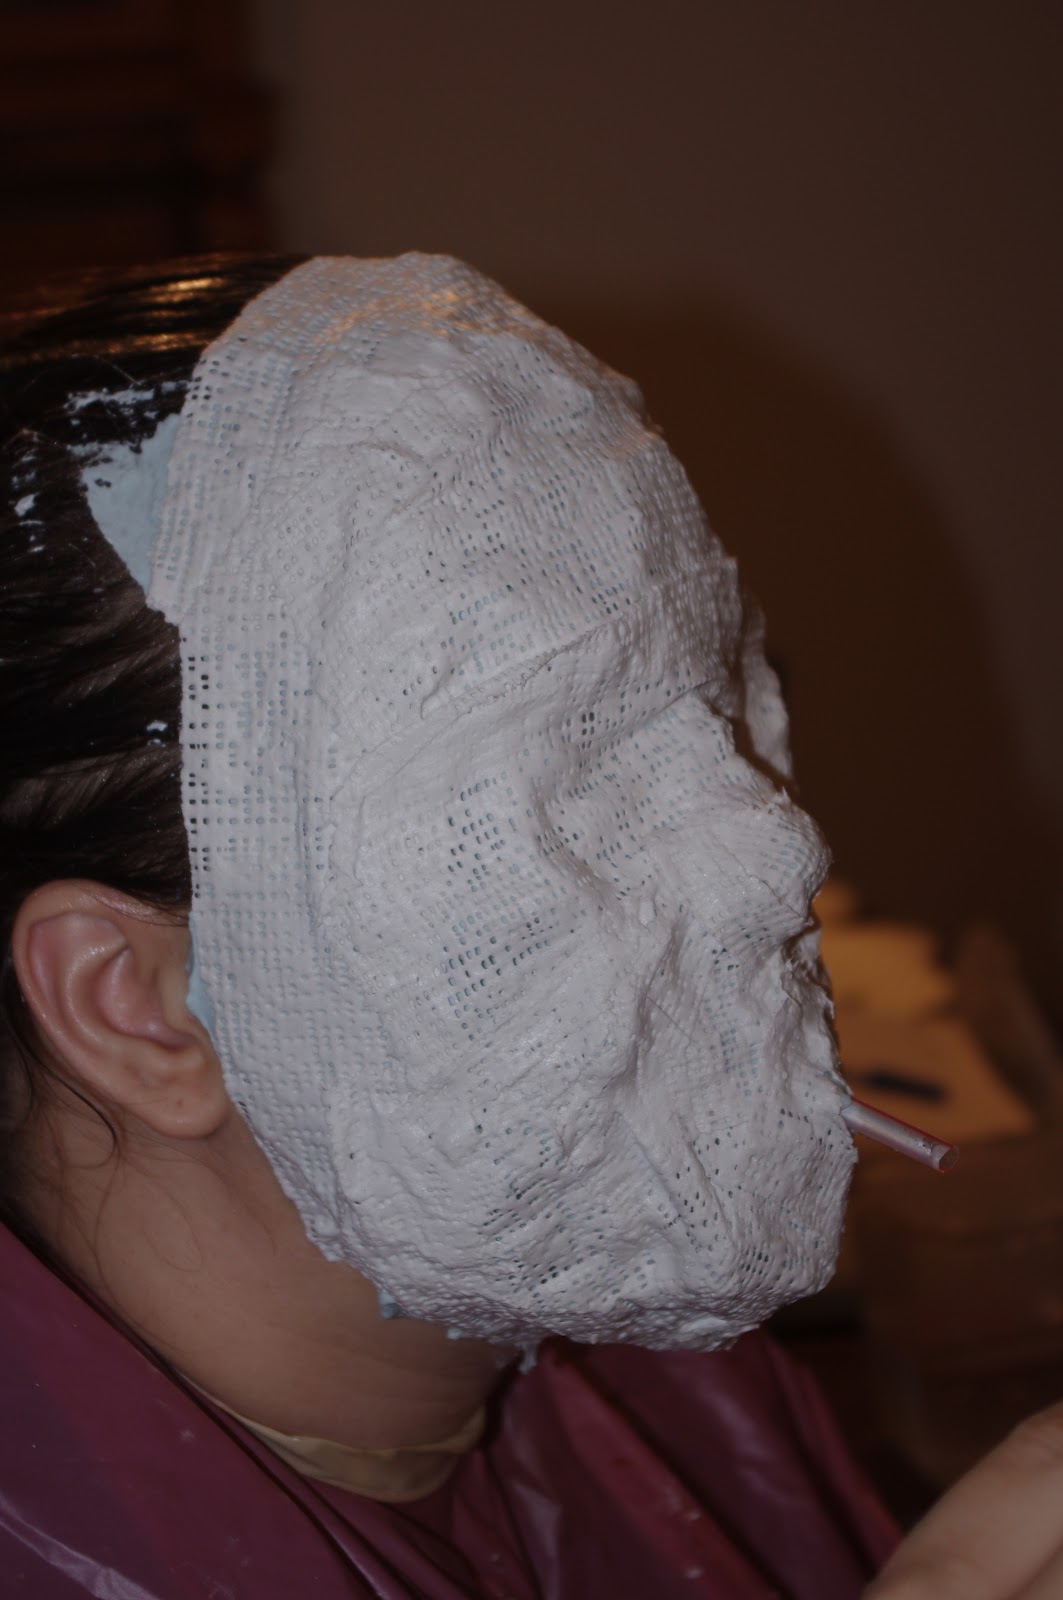
Step 5: Support the Mold with Plaster Wrap Cloth. Some say to let the alginate cure for 5 minutes. Mine was almost dry by the time my husband finished applying the last of it, so we only waited a couple minutes. At that point take some pre-cut plaster wrap cloth, and cover the entire mold. We only did one layer because I didn't want to waste cloth, it worked fine for one casting, but not two. If you want to do as many casts as possible off of this mold before it dries out then double layer it.
A face only a mother could love! (No I won't get sick of these lame jokes!)
Step 6: Sit around for the most uncomfortable 10-20 minutes of your life! By this point in the process, you've probably got drool all over your mouth and chin and are completely miserable. You're totally ready for this thing to come off, but you've got to wait for the plaster to fully dry or you've waste a lot of time! I say 10-20 because it depends on how long i took to put them on. By the time you are done for instance, the first layers may already be dry or well close to it. So feel for yourself whether the plaster is stiff enough to be considered dry.


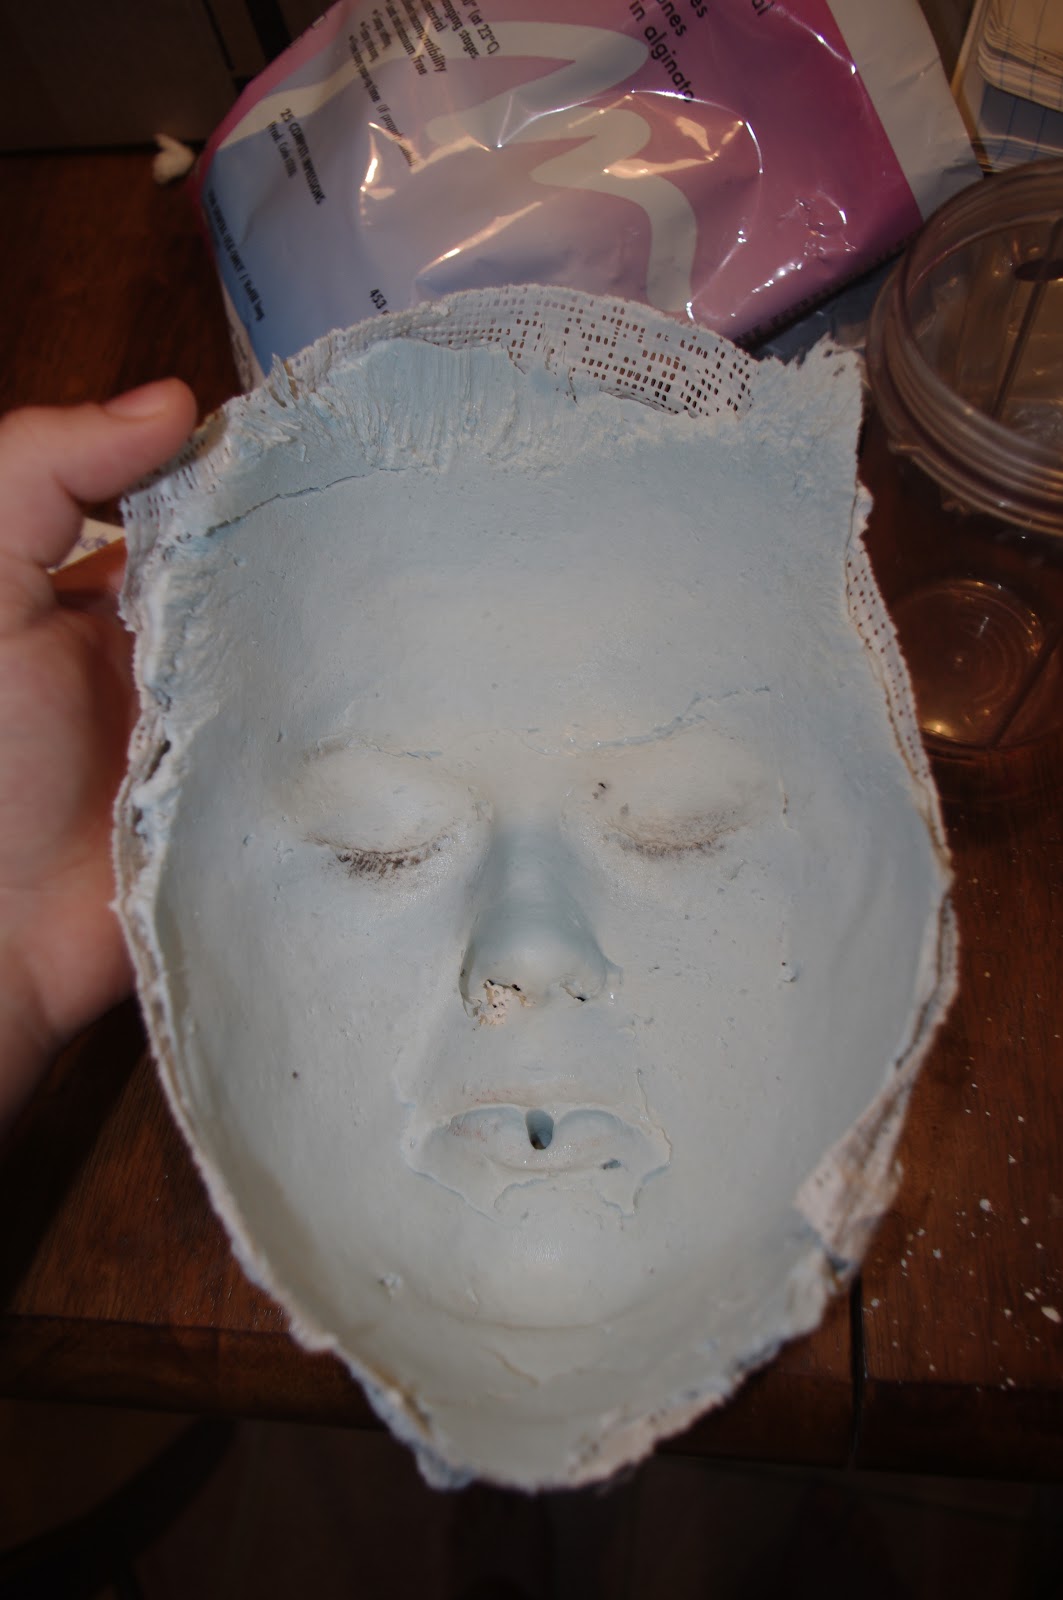
Step 7: After at least 10 minutes, take the damn thing off! Rejoice and appreciate your sight and speech! You can remove it by wiggling your face around and prying all of the edges off. I had trouble getting the top part out of my hair as it stuck a bit.
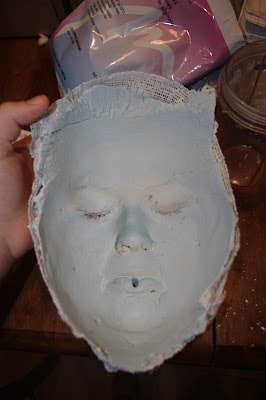
Don't mind the mascara! I cleaned off my eye make up and this stuff still found some leftovers!
I was actually a bit disappointed. For all the trouble this was, it wasn't a perfect mold. I blame that on the alginate. Don't buy alginmax; it sucks! Anyway, it's good enough to get the job done.


Step 8: Mix a small batch of alginate to fill in the mouth hole and any other crevices. Once that's dry you're mold is ready to go! Make sure to line it with some sort of releaser, like more vasoline. I don't know if you HAVE to line it, but it's better to do it and not wonder why you're cast didn't come out.


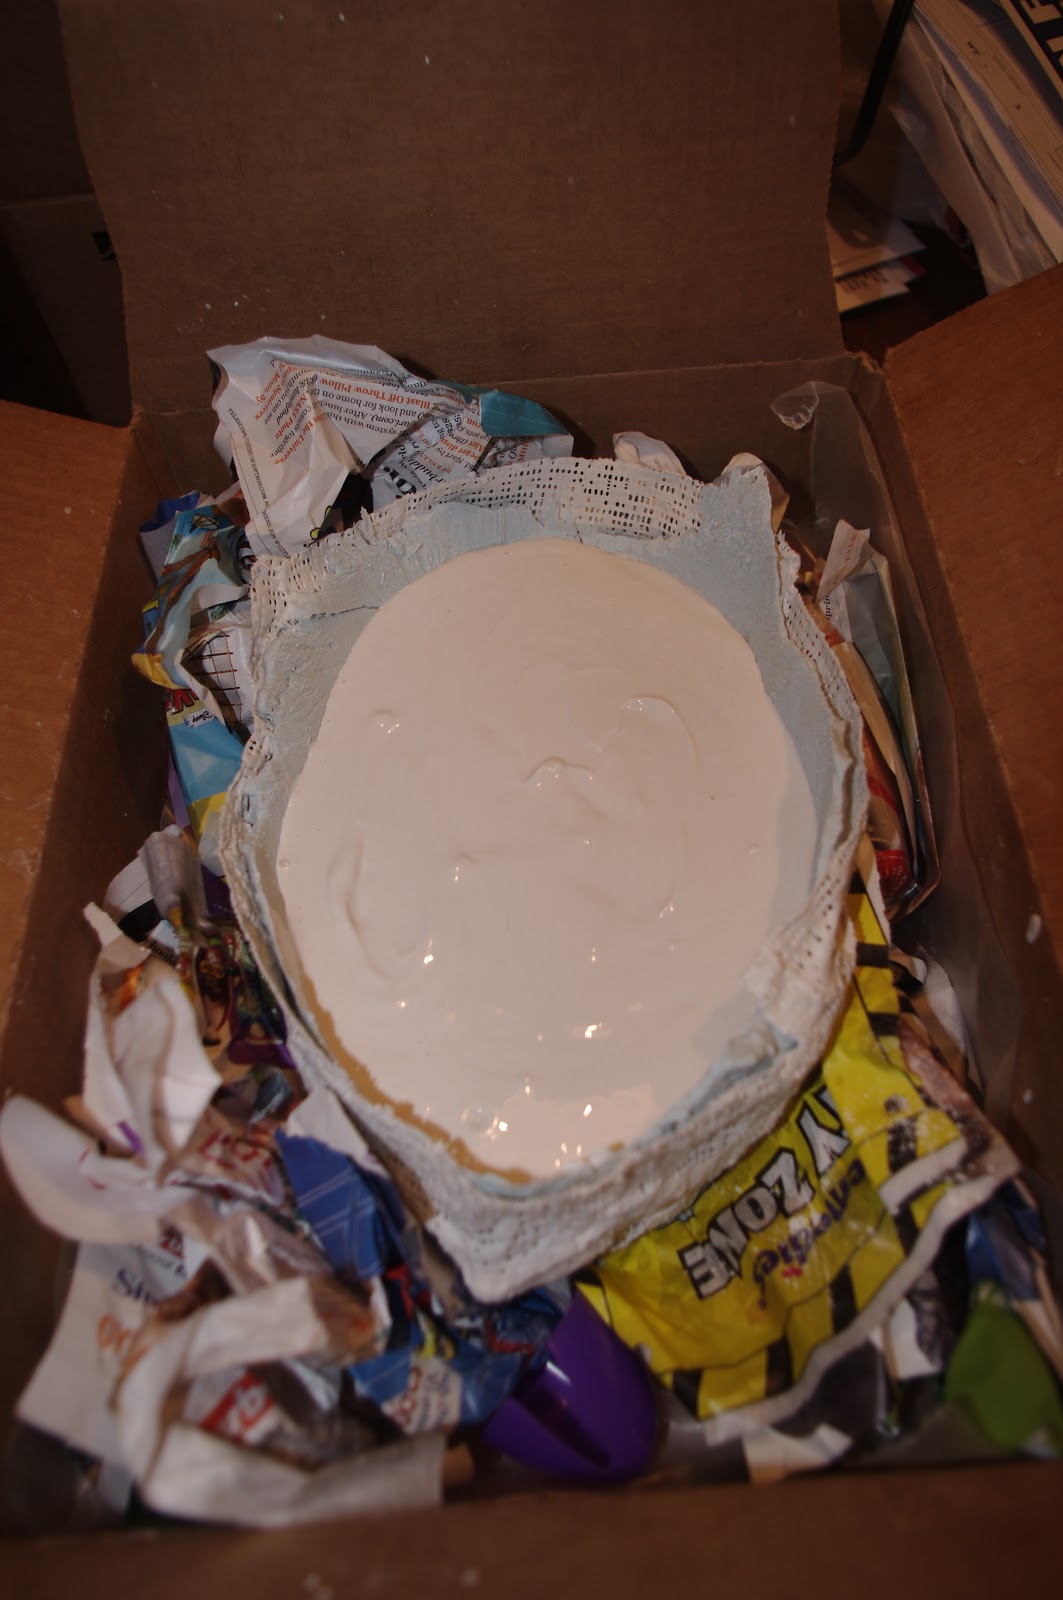
Step 9: Prepare the box with newspaper! If you remember from the plaster/plaster method - we used a box with crumpled up newspapers in it. Go get it again, or make a new one to place your mold in, face first.


Step 10: Mix your plaster or stone. I used lab stone this time because I wanted a more sturdy armature. Plaster is alright, but it's so easily dented and nicked because it's softer. Stone is more, well, hard like a rock. Stone is a little tricky because you use a volume to weight ratio to figure out how much you need. I also had this ordered from a Zahn dental supply - it's called Gibraltar White Lab Stone. But really, plaster works just as well if you don't have the lab connections.


Step 11: Pour the plaster/stone into your mold. Pour it slowly, especially if you're using plaster which is prone to air bubbles. Tap the sides to kick them out. Don't worry too much about it though because you can always carve off bubble marks. Pour it until it reaches the top of your mold, or to the highest point where it won't spill out.


Step 12: Let it dry for about 20-60 minutes. It differs depending on what material you're using. My stone has a 15 minute dry rate, while plaster might take way longer.


Step 13: Loosen the cast all around the edges and take the mold off. Now you have an armature!


I have seen WAY better casts made from alginate molds. I wish for the sake of my troubles that the alginate I had wasn't so quick drying. I probably would have gotten a much better mold with it then. Either way, I hope you had fun living vicariously through my alginate mold experience! Try it yourself if you're feeling ballsy!

Next week I'll be showing you how to make a feature for your mask out of aluminum wire and super sculpey!

Thanks for Reading and Happy Creating!


If you found this post helpful please share it with your friends! I also love a comment! You can get up to the minute updates by following me on Facebook by clicking here. I'm also on Youtube now; please subscribe by visiting my channel here.
 

Tuesday, February 7, 2012

Part 2 of Creating a Bird Splicer Mask Inspired from Bioshock

This is part 2 of this post series - please check here to see part 1 if you haven't already read it.


Next week I'll be concluding Jareth's mask, but I just couldn't get it done in time for today's post, so I'm finishing up the Bird Splicer mask from Bioshock instead. 

Showing how to sew sequins last week led up to what I did next for this mask which was creating the sequined felt cover. I basically followed the steps from my video to cover an entire mask! It took a great deal of time; I was up from 10pm to 5am working on it one night and then finished it the next day in about 3 hours. So about 10 hours total to finish just this part of the mask. 

The sequined mask in progress

Once that was done it was time to gesso and paint: my favorite part! I gessoed the entire mask, every inch of it. Mainly because nothing sticks to plaster or clay, but it you gesso it, paint or glue will stick to the 'teeth' of the gesso. I then started to paint the feathers and beak a nice light brown called "Goose Feather." It seemed appropriate!


I had to paint several layers of this color before it got the right level of depth and then I covered that with 2 layers of a satin varnish so that it would shine. The bottle said to wait 24 hours between each layer of varnishing. I'm not sure why or if you absolutely have to, but I did anyway. It made progress on the mask SO SLOW though!

After the paint and varnish was finalized, the next step was to add all of the feathers to the back of the mask so they would stick out through the solid feathers. I just used a hot glue gun to do this adding a thin layer of down and then glued the larger Guinea quills over that. I layered about 3 of the quills in each section to give full coverage as well as a tapered effect. 

Then it was time to attach the felt lining to protect the face on the inside of the mask. I copied the outline of the original sequined mask at the top, but left some room to work with in case I had to trim it. The eye holes were cut out and then I started to attach it by hot gluing the mask starting at the eye holes. Then the sequined mask went on the front and after all fitting and touch ups we had almost a finished mask!


The only thing left to do, which was my one big goof up in this whole process was to find a way to wear it. Yes in all my excitement, I totally forgot to make holes on the sides of the mask! Honestly though, with the weight of this mask, about 1.4 pounds, the velcro fastenings I ended up using were the best bet. I made a 3 point harness of sorts which makes it attach very comfortably to the head. You can move around very freely in it and the velcro is very secure. I also added some foam to the point under the beak where it sets on your nose as it was a little uncomfortable without it on the bridge of the nose. 

3 point harness to wear it

This piece is now available for sale on Etsy HERE or you can contact me directly for purchase. I would be able to fully customize this mask with different color compositions. I am going to be starting another one, that is more owl-like, with a black/ white/ silver color theme as well. 

Thanks for Reading and Happy Creating!


If you found this post helpful please share it with your friends! I also love a comment! You can get up to the minute updates by following me on Facebook by clicking here. I'm also on Youtube now; please subscribe by visiting my channel here.
 

Friday, February 3, 2012

How to Sew Sequins for Mask Making

This week I made a Youtube video to assist in explaining the sequin sewing! It's my first tutorial and video, so hopefully I didn't say," Ummm" too much. I'm also going to explain the steps in this post for those who want some additional instruction.


How To Sew Sequins

What You'll Need: Sequins (I bought mine here Cartwright's Sequins), thread, regular sewing needle, felt.

1. With an already threaded needle, tie off your thread so that it doesn't go anywhere!


2. Stick the needle through the felt from the bottom and add a sequin by placing it over the needle. 


 3. Put the thread back down into the felt on the very edge of the sequin.


 4. This is how it should look after Step 3.


 5. Bring the needle back up through the felt on the very edge of the sequin in the direction you want to go.


 6. Place the sequin over the needle and pull the thread through. Then put the needle down and through on the edge of the sequin again.


7. Keep doing this for as many as you need!


8. When you want to tie off an edge or just make it more secure because you want to face another direction, try to come up through the felt on the other side and go back down through the hole. This will secure it tightly from two different directions which should hold it in place quite well. 


That's really all there is to it; quite a simple thing really. But if you didn't know how to do it, it's not the easiest thing to find the information on! I had to search for quite awhile and could really only find information on how to sew onto fabric for a costume.

Thanks for Reading and Happy Creating!


If you found this post helpful please share it with your friends! I also love a comment! You can get up to the minute updates by following me on Facebook by clicking here. I'm also on Youtube now; please subscribe by visiting my channel here.